Wednesday, January 22, 2014

DIY to the Test: Result? SUCCESS!


After having a run-in with my garbage disposal, (I realize that sounds like it could be violent. It wasn't.) I felt like it might need some refreshing. I did a little research and found several different recipes for DIY Garbage Disposal Tablets. I altered the ingredients a bit, and I am VERY happy with the result!
*Note* I did not create this recipe!

SO here goes! This is what the finished result looks like:
And here is how you get it!
Ingredients:
Baking Soda: 3/4 a cup
Salt: 1/2 a cup
1 lemon
Any dish soap, though an antibacterial is ideal. 1 tsp (or more if you feel it will help to shape your tablets.)
Parchment paper (optional)
Baking sheet
Gloves (optional)

1. Mix the baking soda and salt together and try to avoid any lumps. The two should be mixed together very well.
2. Using a grater, grate the lemon peel into the mixture. Then cut the lemon in half.
3. After grating, squeeze the lemon juice into the mixture.
4. Add your dish soap
5. Stir all ingredients together with a fork. The mixture should then look like yellow, wet sand! It should feel like it too!

6. *I use my hands for this part. You can use a small scoop or measuring cup, whatever you prefer to shape the tablets, but I feel like it is a lot easier to mold with your hands.* With that said, if you have any cuts on your hand, gloves might be a nice addition. Ouch! If not, I found that the baking soda and salt made my hands feel super soft!
**ANYWAY** I take a small amount in my hand and mold it into a little ball, and then flatten the top a bit. Then place it onto the baking sheet.

7. Let the tablets dry on the baking sheet. *if you choose to use parchment paper, I have found that it keeps the tablets from crumbling quite as much.*

And.......There you have it!
After mine were completely dry, I placed them into a pretty (recycled) glass container! I plan to do another post about how I recycled candle holders and how I use them around the house. Again, another DIY find I found to be a success!

The tablets DO work! They make your disposal smell lemon-y fresh. The baking soda and lemons are commonly used to freshen the disposal. And to top it all off, you have made a household cleaner with NO chemicals!
TO USE:
Place the tablet into the disposal (MAKE SURE IT IS TURNED OFF!) and push it down into the actual grinder. (AGAIN: DISPOSAL OFF!) Run hot water into the drain, and then turn disposal ON.

I had fun making these little tablets, and they look cute next to my sink too!

(Make sure your husband and his friends know that these are NOT edible, because they do look delicious! Unfortunately we actually did have to warn my husband's friends.)
Thanks for reading!
*Kaysi*

Saturday, October 20, 2012

Two EASY recipes for a new wife!

Hi everybody!!! I am so excited to do my FIRST post about cooking! These are two different recipes (one is from a box!) and I am also happy to share where I got them! I will also share what I like to cook with them (side dishes). These are things that have been a success for Paul and me.

Being a new wife, I had never really cooked before. Spaghetti was really as far as my experience went. I had made cookies and whoopie pies successfully (with lots of compliments!), but cooking actual meals is new to me. I had never really cooked for anyone other than myself, and that meant a lot of frozen pizzas and grilled cheese sandwiches. But I realized upon getting engaged that there was no way I could get away with feeding my new husband grilled cheese and bagel bites...

So, my wonderful mother and mother-in-law both sent me some recipes to try! One that Paul really likes is my Mom's "Coca Cola Chicken." She told me how easy it was and PROMISED that Paul would love it!
Sorry the picture isn't the greatest. But you can see the chicken, spinach and strawberry salad, and Paul's favorite food...mac and cheese.

So here is what you need for Coca Cola Chicken:

  • Boneless Skinless Chicken Breasts (I usually make 2)
  • 1 Cup Coca Cola
  • 1 Cup BBQ Sauce (We like Sweet Baby Ray's)
  • 1 tsp salt
*I use one cup of sauce and cola because Paul likes a LOT of sauce on his. For 4 chicken breasts, I would also use one cup for a REGULAR amount of sauce, and of course you can add more as you like! Just be sure to make it equal amounts of each.

  1. Place chicken in a 9x13 dish sprayed with Pam (this is for 4. For 2, use a smaller dish OR make a square out of tin foil that is HALF the size of the pan.) This is easy to do if you don't have a small pan!
  2. Mix together cola and BBQ sauce in a bowl, and add salt. The consistency is pretty thin once the coke is stirred in. Make sure it is stirred well. You shouldn't see any clumps of BBQ sauce.
  3. Pour over chicken in pan.
  4. Bake uncovered at 350 degrees until chicken is tender and cooked through. This is about 30 minutes.
  5. Every ten minutes, I like to take it out and spoon the sauce over the chicken breasts, but you can skip this step if you like!
And...voila! You are done! 

Side dishes we like:
Spinach and Strawberry Salad: (Mixed greens, chopped strawberries, cheddar cheese, almonds, raspberry vinaigrette dressing) 
Macaroni and Cheese (for Paul!)
Cream Corn and Biscuits: (Don't knock it til you try it!) We bake Grands Southern Style Biscuits, make some cream corn (from a can!), cut the biscuits in half, and spoon cream corn on top. Seriously....try it.

MY FAVORITE SIDE DISH: Wash 1 to 2 potatoes, slice them VERY thin, place on a baking sheet sprayed well with Pam, cover potatoes with olive oil, and sprinkle cayenne pepper and black pepper. Bake at 350 for as long as you like! I LOVE them spicy, so I use a lot of cayenne. I think it would also be great sprinkled with parmesan cheese!

********************************************************************************
Recipe #2

"Homemade" Bread

I was grocery shopping at the commissary the other day, and I was starving. They say not to grocery shop when you are hungry, and this is correct. BUT, if I had not been so hungry I may not have bought  my new favorite thing to bake! 

Paul and I are about to go on a trip, so we didn't want to buy a whole loaf of bread. But we needed bread...which leads me to ask: why has no one thought to sell bread in "Half Loaves??" Just a thought. ANYWAY, I was on the baking aisle looking for a dessert to make for company who was supposed to come over. I didn't end up buying a dessert. Instead I found homemade bread mixes! We don't have a breadmaker. Probably never will....but this only called for an oven! I am a bread junkie, and I always have been. I could live on bread even though I know it is not good for me. So I HAD to try this mix!
I believe it was around 1.50 at the commissary. It was definitely less than 2 dollars! It is Fleischmann's Simply Homemade bread mix. 

I bought the mix in country white. Seriously....this is the easiest thing I have ever baked. All you need is included, except for tap water and a tsp of flour! Here is the VERY easy process:
 Here is my finished product. It doesn't look like the picture on the box....duh. Does it ever?

  1. Mix the yeast packet and sugar packet with one cup of very warm tap water. Stir together until it is well blended, and then let it sit for 2 minutes. It is ready when it starts to bubble a little bit.
  2. Add the dough packet. Stir until it becomes a ball. Mine was a little sticky! I think my water may have been too hot. But a very simple fix: add flour! I used a spoonful. 
  3. Next it says to place the dough in a warm area, draft free. So I placed a large mixing bowl over the dough and sat it in the corner of my kitchen. Let it sit for 25 minutes. During this time, the dough rises. It doesn't do anything major, like double in size, but it does rise.
  4. Shape the dough to either make it look like a typical bread loaf, or a circle. I did the circle, because I knew I would fail at making a pretty loaf! The recipe suggests making a couple of cuts into the top of the bread. 
  5. Place onto a cooking sheet (I sprayed Pam on mine) and bake for about 20-25 minutes. The bread should be a golden brown on the outside and bottom. 
This bread was a success! It tastes DELICIOUS, like it spent hours in a bread maker. The only mistake I made was not baking it for the full time suggested. Our oven gets a little too hot, so I cut a couple of minutes off the baking time. It still tastes great, but it is a little softer than I would like. It is still great though! And it is smaller than a loaf bought in the store, so none will go to waste before we go out of town! It is delicious alone with butter, but I also like to eat it with soup. I toasted a piece of it and used it instead of croutons!

I know these aren't fancy things to make, but they have turned out great at our house! I hope you enjoyed reading!


Sunday, September 30, 2012

New makeup purchase! *URBAN DECAY

OK, so if you know me at all, you know that I am a definite makeup junkie. It is a hobby of mine. I love buying and testing new products. I love reviewing them and reading reviews on beauty websites....I could really keep going, but I won't! The point is, I started this blog to talk about 2 things: Married life and Makeup. : )

There are a few different products I have bought recently that I want to review, and first is a purchase from the brand Urban Decay. I buy Urban Decay products from Sephora or Ulta, or on either of the websites of these two stores. (I prefer buying Sephora online instead of the store; they offer 3 free samples and free shipping on purchases over $50!) This particular product is a limited edition online only set. 

Urban Decay is a "high end" brand, basically meaning that it is excellent quality, and, well...you get what you pay for. It is more expensive, but the products I have tried have ALL been worth it. Urban Decay is probably most known for its FAMOUS NAKED PALETTE! This is a palette of matte and shimmer neutral shades. It is honestly an amazing makeup purchase. I have had mine for over a year and the shadows really do last for forever and ever! 

This particular post is about a very special Urban Decay purchase. It is a limited edition eyeliner set!  I would also like to mention something else about Urban Decay before I start the review: the new "Build Your Own Palette." Urban Decay recently re-formulated all of their eyeshadows, and they are outstanding. I compare them to MAC shadows in quality; they may even be creamier and more blendable  (in my opinion!). Urban Decay recently released this new (LARGE) line of shadows and a metal palette which allows you to snap the shadows in and out, to feature any of your favorite four shadows at once. I hope to review my palette soon!

OK....on to the pictures!
The Urban Decay "Ocho Loco" 24/7 Glide-On Eye Pencil Set
These eye liners are amazing. They are SUPER creamy and pigmented, and after owning just one, i decided to buy the set. It was an AMAZING deal ($59 for eight liners and a great sharpener, totaling a $152 value).  
The eight beautiful eye pencils and "Grind House" Sharpener
As you can see, it is a nice collection of neutrals and fun colors. "Perversion," the black color in the middle, is the BEST black eye pencil I have ever used. It is honestly the blackest and creamiest pencil I have ever found. It puts Smolder by MAC to shame. 


Swatches
HOW I USE THEM: I love to use these pencils as both eye liners AND as eye shadows! Especially for a smoky eye look, just pencil in the area you would like to shade, and then blend it out. But my FAVORITE way to use them is to use the dark black on my waterline and line under my eye with a color which complements my eye shadow look that day. I like to smudge it to make it look smoky. There are are so many colors to choose from, the looks you can do are endless!

WHY IT'S A GREAT VALUE:  Just ONE of these pencils alone is $19. That is crazy expensive for ONE eyeliner! But with this set, you get eight, plus the sharpener which retails for around $10. So...do the math...19x8 is $152. But...this set retails for $59, plus it includes a sharpener! Take a good quality drugstore eyeliner. Maybe it costs 6 or 7 dollars. Multiply that by 8...throw in a sharpener, and you are looking at anywhere from $50 to $60 dollars. Needless to say, this set is a great deal!!!

HOW TO PURCHASE: Like I mentioned above, this product is an online only, limited edition product. I purchased mine at www.sephora.com. 

More makeup reviews to come! Thanks for reading!

Saturday, September 22, 2012

My PERFECT wedding cake! (And the crazy secret behind it)

In my opinion, the cake is one of the best parts of wedding planning!!! The possibilities are endless! They can be virtually any color, any height, any shape...they can have one layer, or eight, they can be fondant, or buttercream, or filled, or.....like I said: endless! Don't even get me started on the flavors! Mmmmm. Now I am craving cake.
photo from www.theknot.com

I always imagined that my cake would look somewhat like the picture on top. I always thought I would have a decent sized wedding in my hometown. But when you marry a soldier, your priorities change! I decided to move to his base and marry him here because every time he submitted a request to come home and marry me, it was denied. It was absolutely impossible to plan a wedding. So....we "eloped!" The " " are because we told people. We didn't run off in secret and come back married. I did run off...but I brought family with me! There were nine people total at our little wedding. Mom and I drove 24 hours to Paul's base, and well, there was no room in the car for a big cake! 

My Mom is amazing. Even though we had to plan a last minute, tiny little wedding (which I would NEVER trade for anything), she wanted me to have as many things as possible that traditional weddings have. She didn't want me to miss out! One of her ideas was that we should go to the commissary (on base grocery store) and order a little cake there. We would eat it after the ceremony in the hotel lobby. 

Some of you may have read this on my Facebook, but here is the story behind our cake:
We (Mom, Paul and myself) went to the bakery section of the commissary and ordered an 8 inch white cake, buttercream frosting, white cake. When the lady found out this was our wedding cake, she asked if we wanted any decorations on it. Not knowing what type of decorating an army grocery store would come up with, we just said "you can put some little white flowers on it if you want!" They said okay and gave us a receipt. Two days later, Paul and my mother-in-law Beth went to pick it up, and it was the prettiest little cake I have ever seen. It completely blew my mind, and exceeded my expectations. There was some type of whipped frosting that was designed in a lace-type detail. The flowers were gorgeous....It was just...wow.  

The best part:  it cost ten dollars. 
And being on an army base....it was tax free!
Some people pay hundreds (maybe thousands??) of dollars for a wedding cake. 
Mine cost ten! And....it was honestly the freshest and most delicious cake I have ever tasted. We ate the leftovers for three days! And guess what! Since we ordered it at the on base grocery store, if we ever want to taste it again, we can just order another cake for ten bucks!

Friday, September 21, 2012

Finding THE DRESS!!! Advice and my experience!

This is my wedding dress experience. I am not super knowledgeable in wedding fashion, and I don't think that I am either! This is just MY ADVICE based on MY EXPERIENCE. Enjoy!
Some photos from www.alfredangelo.com
******************************************************************************

A couple of years ago I came to the realization that I am in "THAT" age range...the one where it seems like EVERYONE you know is getting engaged. You can't get on Facebook without seeing another ten posts of beautiful diamond rings with the caption "I SAID YES!" And when it was finally my turn, I did the same exciting thing! After the proposal (which I may or may not share the story..it was very private and sweet, and I may decide to keep it that way), I took the next exciting step: finding my wedding dress!
I poured through magazines, dog-earing pages that had dresses that met all of my requirements (or what I THOUGHT they were at the time), I spent hours on websites adding dresses to my "favorites," and overlooked a ton of dresses because they didn't meet the "things" on my must have list. Here was the list:
  • MUST be A-Line. I am not a princess, nor do I want to look like a cupcake. Just enough gradual flare is all I want.
  • MUST be mostly lace. I just love the look of lace.
  • MUST be "relatively modest," as I do not wish for catty people to gossip about a low neckline or  too much of my back showing. Also...the main reason...the purpose of a wedding is to vow to love the other person for eternity..not to show skin and draw attention to the wrong things.
  • MUST not have any ruffles, feathers, cut-outs, bows, or puffs of fabric. I don't want to look ridiculous
  • MUST BE IVORY!
Looking back, my rules were stupid. And I broke 50% of them!

I visited three stores total, and I stopped at three because I found THE dress, and the FIRST bit of advice I can give is this:
WHEN YOU FIND THE DREAM DRESS, STOP LOOKING! Nothing will compare to it, and it will start to lose the special feeling of looking for your dress.

Moving on: I found one dress at the first store, a local privately owned bridal shop. The dress was a lace A-Line with a modest train and boring neckline. But it fit all the "rules," and it was only $400 dollars. It was beautiful! But it just didn't "feel right."


Next was Alfred Angelo. I spent hours on the website. I had a list of all the styles I wanted them to pull. And I went in KNOWING which dress I wanted. It was at this store where I realized that I was boring. I pulled at least ten dresses. Some were disasters, like my "dream dress." 

Being in between sample sizes, none of the dresses really fit right., but I could still get an idea of what I liked. The reason I wanted to go to Alfred Angelo was because of the Disney collection!!! Who doesn't want to be a Disney princess, right? I tried on four from this collection: Belle, Snow White, Sleeping Beauty, and......Cinderella. They were all beautiful. Stunning. Unique. True to the Princess. But none was like Cinderella. 
Cinderella is a TRUE ball gown. It was not lace, and it was not ivory. It was not simple, it was not A-Line, and it was COVERED in glitter. The train was several feet long, and the beading was exquisite. My mom cried when I put it on and said that it was "me." I agreed....and yet it broke all of my rules! This was it. This was the dress. Even though it wasn't entirely fitting to the small (VERY SMALL and simple) wedding I wanted, it was stunning. I felt like a princess! 

I was ready to quit looking, but there was one more dress hanging in the dressing room. It hung there alone on the back of the tiny room, and I debated not putting it on at all. It had asymmetrical ruffles cascading down, and after my lovely experience with a ball gown, I decided this dress didn't have enough flare. But....the top of it was this beautiful ivory lace with very pretty beading. The color of the lace is what caught my eye when it was hanging in the store. To be honest, that was the only reason I pulled it. I was sick of trying on dresses at that point, but I groaned and put it on. It took forever to be laced into it, and lacing was a new experience for Mom and me. Finally I walked out onto the floor, stepped up on the platform and looked in the mirror. I didn't say anything at that moment, but I was sold. Cinderella was beautiful. But this dress was something unique and creative, and it flattered my figure in a very classy way that no other dress could. It was a little big, but it could be ordered in my size. I didn't remember seeing it on the website. I overlooked it because it broke the ruffle rule. But the odd symmetry and ruffles were the details that made it so lovable. It looks entirely different on me and the model. It just goes to show that YOU CANNOT JUDGE A DRESS BY A PICTURE!! YOUR BODY JUDGES A DRESS IN A WAY YOUR EYES ARE UNABLE TO!

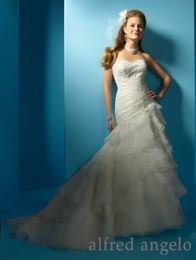
My dress (style 2123) on the model. They have it positioned weird. The shadows downplay the ruffles. Sorry, but the skinny model just doesn't fill it out! I overlooked it on the website. But on me....it was my dream dress.

This was the sample dress. It was a little big, but I just knew. I visited David's Bridal, and found a dress there too, but it didn't compare. I went back to Alfred Angelo the following week and ordered this exact dress, but smaller. I lost about 15 pounds before my wedding, and my dress fit me like a glove. The deciding factor was that I KNEW Paul would love it. I don't know how, but I just knew. That thought brought tears to my eyes. Another factor: my Daddy loved it too. : )Mom cried, and Dad sat quietly and smiled and nodded. 


This post has been insanely long. It is time to end! To sum it all up, here is my wedding dress advice:
  1. Do NOT be afraid to break your rules.
  2. Learn what flatters your figure, and go from there. I am an hourglass figure, so ball gowns, A-Lines, and some Mermaids do well on me. 
  3. Pick maybe ONE or TWO items from your must have list, and choose different dresses which also feature different details. Don't pull 17 A-Line lace dresses in Ivory. Start with the style...then maybe go with the color...then pull different things. You never know what you like until you try it on!
  4. Do NOT NOT NOT write off a dress until you have put it on. If I had done this, I never would have found my dress: the lonely dress with ruffles hanging in the dressing room, the last to be looked at.
  5. Stick to your budget. I didn't mention this above, but Mom and I set a budget and I didn't even try on something that was above budget unless it was on sale, or verrrryyyy close.
  6. Speaking of money: the great thing about local stores is that the owners OWN the dresses and therefore can set the prices. They are often the lowest you will find. Go in little bridal shops too! I just happened to find mine at a large chain store!
  7. Chain stores: Almost always have sales! For example, the weekend we bought my dress, Alfred Angelo was having a sale. For however much you spent, you got a certain discount. I believe my discount was somewhere between 50 and 100 dollars. Also...if you buy from chain stores, ask about accessories! My veil was discounted, as was my slip, and if I had decided to have bridesmaids, their dresses would have been discounted!
  8. If a dress doesn't have the "perfect" shape, ask about different undergarments. My dress wasn't "poofy" enough (after Cinderella entranced me) and the sales associate had a simple fix: a trumpet slip! It was slimming, AND it offered me the "poof" I wanted!
  9. AGAIN: When you find THE DRESS: Stop looking!
  10. Take pictures in magazines into consideration, but don't plan based on them. Your body chooses a dress. It is that simple.
I could keep going with the advice, but I am gonna stop here. I hope you all enjoyed this post! (If you had the patience to make it to the bottom!!) 
Thanks for reading!

Post #1 of this new hobby of mine...

Hi everyone!!
I decided to start a Blog for a bunch of reasons...
1. I moved far away from home, and I want to update friends and family on our new life!
2. I have a bunch of things I would love to share that I think might get annoying on Facebook (aka makeup reviews, makeup looks, wedding experience, dress buying, life as an army wife, etc.)
3. Since my husband Paul is a hard working soldier, I spend most of the day alone at the apartment and I am always looking for something creative to get into.
4. Someday I would love to have a job in the makeup industry (no matter how small the job), and I want to soak up every experience I can reviewing products, creating different looks for different occasions and time of year, demonstrating how to create them, giving tips on bargains and splurges, and many more things.
5. Since I am a new wife, I am learning a lot about cooking and home-making, and I get really excited about new accomplishments!
6.....Ok, I think I have given enough reasons here. You get the idea! 

BASICALLY....from this Blog, be on the lookout for lots of girly stuff. : )

This is my husband Paul and myself on our wedding day!

I'm a Bride!!!